|
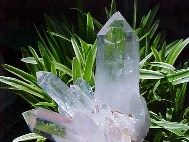
CLEANING
YOUR CRYSTALS
First, spray ALL clay and dirt out of the crystals. Baking them in the sun and spraying them off, then baking and spraying again, rather than picking them clean, makes this less labor intensive. If you decide to pick the clay out which is often more fun, be very careful not to damage the crystals...we recommend wooden skewers or tooth picks, as metal can damage the crystal. Dental tools may also be used with great care, though.
METHOD 1 ~ You will need 2 plastic 5-gallon buckets, 1pound of acid, a large, black plastic bag, and rubber kitchen gloves, for protection...always a good idea.
Place 1 pound of oxalic acid in the bottom of a 5-gallon plastic bucket, being careful to not inhale any... in its powder form it is most dangerous, so a mask is always a good idea. Slowly add the water, mixing in the acid as you go. Fill it about 1/2 full and set it aside. Then, drill 1/4" holes throughout the sides and bottom of the other bucket, making a
colander. Carefully place the crystal in the colander 1/2 to 3/4 full, and gently ease them into the bucket with the acid. You can slowly lift the colander up and down in the acid to stir up the acid over the crystals. (We call it "irritating" the crystals...LOL) Place a black plastic garbage bag over your buckets and put them in the sunlight. Soak them for about a week, irritating them often, and then you can pull the colander out and spray all of the crystals while still in the colander first. If they are not yet iron-free yet, you simply place them back in the acid bucket again and recover them placing them back in the sunlight... The black bag over the top allows the sun to warm the water without destroying the acid by exposure to the
UV rays. Rubber gloves are highly recommended when working with the acid solution, especially for those with sensitive skin. If most of the iron appears to be gone, then you can individually remove these crystals and spray the rest of the acid off of them. Any residue acid will be yellow in color, so if you spray off all the yellow, your crystals should be acid free.
METHOD 2 ~ The crock pot on low is also a great way to clean your nicer, smaller pieces. Fill a ceramic crock pot 3/4 full with water and measure out a 1/2 cup of acid and using a plastic ladle, gently stir it into the water. Still using the ladle, carefully place your crystals into the pot, making sure to cover them with at least 2 or 3 inches of water. Cover them, and set them on "low" to bring them to a low simmer for a few hours. Remember to keep an eye on the pot, and add hot water only, keeping the crystals covered by at least 2" at all times. If you let the water burn away, you take a chance on damaging your crystals. Let the crock pot cool down naturally before you try to remove the crystals. Never take them out of the acid bath
while hot and immerse them in cold water. They can shatter just like glass, and you don't want to damage these beauties. When they have cooled down, you can place them in a strainer to rinse them with
water, or spread them out to spray them off, removing any signs of yellow acid. Then lay them out to dry in the sun.
For a really beautiful shine you can also soak them in another acid (pickling vinegar). Be sure to cover the container though, or you will smell vinegar for a week...LOL!
|